

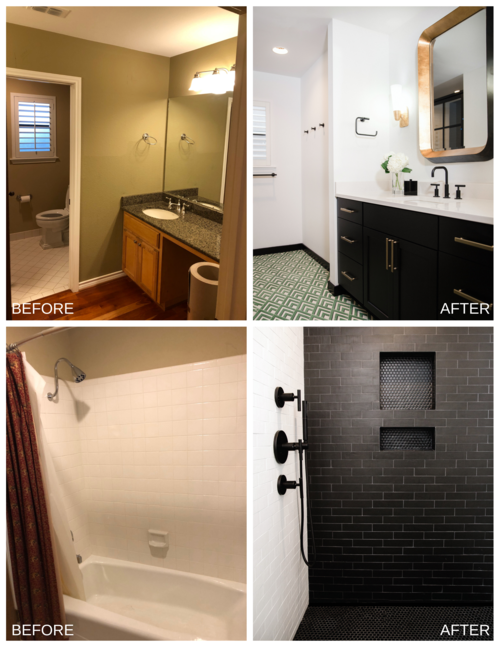
 When we say we’re “tackling a room” it’s usually a figure of speech. But saying “tackling a room” in this bathroom renovation is pretty close to being a literal description! We demoed out the hallway cabinet, bathtub, shower surround, shower fixtures, vanity and lighting. The drywall was also demoed out for the new bathroom layout and pocket doors. The toilet was moved to a different location to accommodate the new bathroom design. The tile was demoed out for a new flooring installation. In short—no corner was left untouched in the transformation of this space!
TOP ROW B & A: The current vanity plumbing was moved to accommodate the new sink and faucet location. Afterward, the new sink and faucet were installed. BOTTOM ROW B & A: We then moved the shower plumbing to the new wall and began the installation for the shower fixture and trim pieces. A new shower pan with curb was built into place. Fabrication and installation of hardiboard and waterproofing were set for tiling. Framing with schulter edging was done for the shower niche. New tiling was also laid for the shower floor and shower walls up to the ceiling.
PRO TIP: Shower niches are game-changers when it comes to in-shower storage. When renovating your bathroom, it’s easy to let this detail slip your mind. As you design your new shower, think through how you use the space and what niche needs you might have.
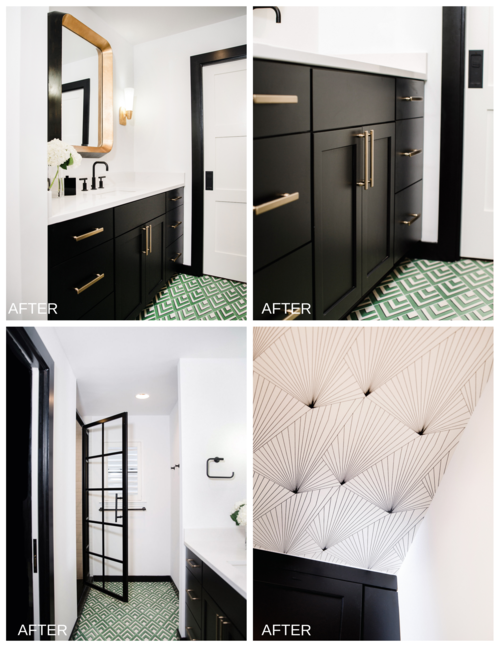
For the drywall work, new drywall was installed and textured. The texture on the ceiling was worked to a Level 5 finish, allowing wallpaper installation. The Level 5 finish is required to achieve the highest degree of quality by providing a uniform surface that does not have any kind of superficial blemishes that will show through the wallpaper. (BOTTOM RIGHT): Wallpaper was then installed on the ceiling of the toilet room.
Much of the beauty of a newly renovated space has to do with proper construction of the things underneath…the things you don’t naturally see. For example, we wired and installed new bathroom can lights, light fixtures, and 2 scone lights. All of the new lighting contributes to the aesthetic of the design. For the flooring, once we moved the toilet we brought in fresh concrete to level out the floor and prep it for the amazing new green tile pattern that contributes so much life to this newly renovated space. New baseboards and door trim were set throughout the bathroom floor.
And the final step: PAINT. In addition to the bold, newly painted black custom cabinetry, the walls, ceiling, trim and doors were prepped and painted to give a full repaint and fresh new feel to the entire bathroom and hallway wall.
Are you a visionary? Can you imagine what you would want for a “new” bathroom in your home? Do you know you need help? Contact us today! We can put you in touch with a designer that is perfect for your space, and give you a complimentary estimate on your home today!
Designer: Natalie Howe Design – Photographer: Sophie Epton Photography